React-Native Firebase Tutorial
Getting Started With React Native and Firebase Tutorial
I finally bit the bullet and bought a mac recently. The first thing I wanted to do was try out was Xcode and build some simple apps. I have past experience using React so I thought it would be natural to play around with React Native to build a simple app with a firebase backend.
Today we will be making a simple food list app that will allow users to choose what meals they would like to have during the week. We will use fire base to store the meal information and we can easily add edit and delete any meal. We will have three main scenes one is the list view where you can see all your meals sorted by day. In this scene we can also swipe left and delete a meal that we no longer want . The next scene will be the meal detail where you can get more information on the meal such as ingredients. This scene will be triggered when you click on an individual meal. Lastly we will have an add/edit scene. I am still learning flex and how to style my code so if you have any tips to improve the look of the app let me know! Here is the Github page for the code. For my next project I would like to use the FHIR api to develop some simple react-native healthcare apps that can pull in patient information.
Install the following packages.
To get started you need to install react native you can follow the basic install guide steps here. install the following addiontal packages we will use for this app. NPM install react-native NPM install react-native-form-generator NPM install @maintained-repos/react-native-swipeout NPM install firebase NPM install react-native-vector-icons.
You can also look at the package dependencies here.
One of the things I wish someone told me sooner was that you can debug and view console.log statements straight in the terminal. you just need to run react-native log-ios Starting from a new react-native project create a new folder called components. This is where each of your react components such as The list of meals, add and edit pages will live. To launch a react native app type react-native run-iOS. This will package your app and launch the simulator. The index.ios.js file is the entry point into your app.
Create a Nav Bar header
The Nav bar header will be the area where most of our navigation controls will be located. In this app we will have an Add and Edit button to the user can add new meals. Addtiionaly when the user traverses through different scenes a back button will be used to go back one scene.
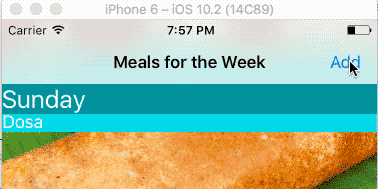
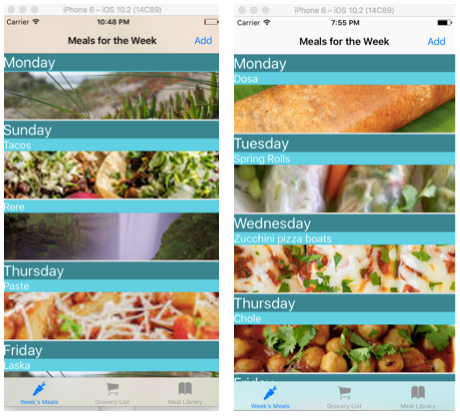
Create a Listview for displaying the list of weekly meals
For our main page in our app we will be using a list view to display the the daily meals sorted by day. They will have the title and image of the meal. We can delete an item by swiping left. Additionally we will have a navigation bar where we can add a new meal. The main components of list view are datasource and rowData. You can think of rowData as each indivual meal in our database. With that you can call the specific keys for that data such as the meal title or the meal day. So for each meal in the list it will render a row item each with its specific information.
Connecting to Firbase
First lets create an entry in firebase. So now in our react code we want to gain access to this data and display it in our list view. the list view component works by taking in a datasource and rendering each row and section header. To gain access to our firebase api we will need to make a call to our database from our react app. We can create a separate file so we can call Firebase in from multiple files in our app. If you try to initiate Firebase you will get an error saying firebase has already been defaulted.. Create a firebaseconfig object with your unique firebase keys. We will be using the database portion of firebase so you want to export that so it can be accessed through different files. Firebase also comes with a login feature. You can now add this to our meal list where we will call firebase to gain access to our recipes. We specify in our call the specific node of the database we want data from. In this case its all the meals.
For this app we will use a simple Firebase schema so we can retrieve information about our meal. Each item will have a unique key, title, day, ingredients list, and image. With Firebase you can manually enter in data into the database which is great for prototyping. So we are going to add data for a few meals so we can display them in our list view. Later on we will add data using our app instead.
listenForItems function will update the state when there are any new changes to the meals database. It will update the state with any changes which will allow our react components to update accordingly without having a page refresh. That is one of the great features of react is that it has the ability to update only the components needed when it notices a change in data.
How to create and order section headers
In order to organize meals by day we need to create mapping function that groups the meals that have the same day together. This will create a header for each of the meals for the particular day.
If you do not set the header with the initial mapping order it will not go in sequential order with the days. This is because it will it will just go off of what comes first in the database. As you can see below Sunday does not come after Monday although i wish it did! So to order the data we are setting the initial order of our map to correspond to the days of the week in our array.. var dayMap = {Monday:[],Tuesday:[],Wednesday:[], Thursday:[], Friday:[], Saturday:[], Sunday:[]};
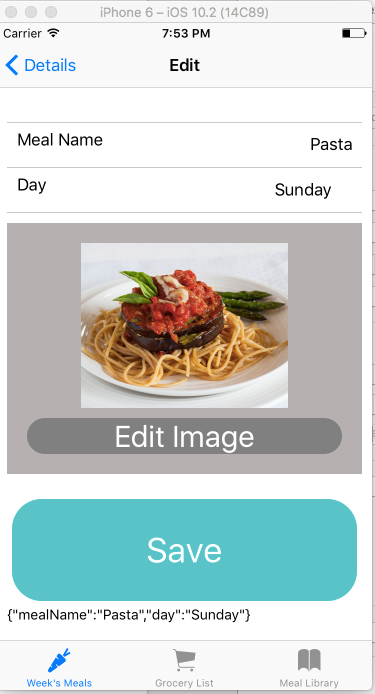
Create a detail view for each meal.
Detail view is a scene that displays more information about the meal selected. From list view if you press on a meal it will bring you to detail view so you can look at the ingredients and edit any items. So in order to pass the property of the meal to the next scene we pass props which sends over seed data . So in this case all items except for the key might change so we cannot depend on props to have the most up to date state. We will use the key to pull data for our meal. So if the data gets updated in an other app we will see the data get updated in our view. One of the things that I ran into was when i used Props to pass state for all items such as title and image this is actually an anti pattern in React. If I edited meal and clicked the back button the data of the meal would not be updated because its state is from the props being passed from the original view and not the most current data in the database. So i had to set the state of the title and image of the meal to listen to any database changes. The key would still be props because we do not want that to change and it will be used to query our database to retrieve these items. If you look at our detail view scene we have a few components. The top title bar includes the meal name and the day. While the two cards below it display the image and ingredient list.
Create an Add button to create a new meal
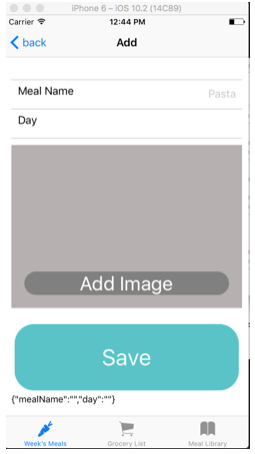
Instead of manually adding new items directly through the firebase console to update the database we will create a new component in our app to add new meals. For the first iteration we will be able to define the meal’s name, image and what day we plan on eating it. In the home screen we have an add button so the user can easily add a new meal. Once this button is pressed it will render a new scene which is the MealForm component. For our form component we will be using react-native-form-generator package. It will allow form data to be captured in a form object that can then be passed into our firebase database.
We are using a package to easily handle creating forms. The point of the form is to take the user inputs and then when the save button is clicked to upload the value of the form entires to our database.
For firebase we have .push which creates a new entry within the database with. a unique key. We pass the following meal object ’s key and value pairs. Next we will clear the form and automatically navigate back to our main meal list screen where you can see the newly entered meal information.
How to upload an image
To upload a image to our app from our image library we will call the . A neat trick I found was that you can save images from the web directly on your simulator. So I saved a few pictures of the foods i want to add. The function will get the image’s local file path. This path will be saved to our firebase database.
In part 2 i will show you how to edit and delete meals from your list